Add Devices to CloudStream DM
The DM Agent application is required for Ricoh devices to initiate all communication to the RICOH CloudStream Device Management (DM) server. Once a working DM Agent application is running on the device, it is added to the CloudStream DM, and a DM Agent Certificate is assigned to it.
Use the DM Agent Deployment tool to install the DM Agent application on multiple devices in just one operation.
As of version 1.7.0, the DM Agent Deployment Tool does not require administrator privileges to run and install. Per-user installation can be performed. It is recommended to remove the older versions of the Deployment Tool before using the new version.
Quick Links
| Uninstall or Upgrade DM Agent |
| Update Firmware |
| DM Agent Troubleshooting |
Before running the installer CloudStream DM, make sure the following prerequisites are met.
| Prerequisites |
|---|
|
|
| Install the tool in DM Agent Deployment Tool Installation. |
| Target devices are connected to the same network where the DM Agent Deployment Tool is running. Please find the list of supported model names in Supported Printers.
|
Gather the following information.
|
|
If you use a proxy server, please gather the proxy information. For the DM Agent to work correctly, the proxy setting must be set correctly in the Web Image Monitor. Login to the device's WIM, browse to Device Management ® Configuration ®Screen. Scroll down to locate the Network/Interface section, and look for the Control Panel: Proxy Settings.
Test the configuration to ensure device registration is successful.
|
 You have enough
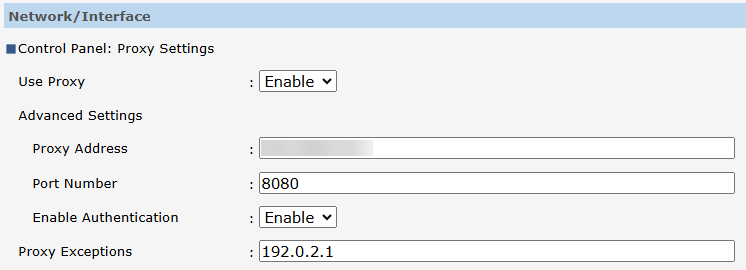
To install DM Agent, follow the steps below.
 Only devices in IPv4 address can be added to CloudStream DM.
| Order | Instructions |
|---|---|

|
(Optional) Setup the Display Name Format |

|
Add the Access Profiles If one of the target devices uses SDK/J, you must obtain SDK/J password information from the device, and an SDK/J Platform account must be created in CloudStream DM. |

|
Install the tool in DM Agent Deployment Tool Installation |

|
DM Agent Connection Settings |

|
|

|
|

|
|

|
(Optional) DM Agent Summary |

|
(Optional) Check the installed application in device's WIM.
|
You can update the DM Agent version by either running a configuration task in CloudStream DM, or adding the DM Agent column to the Device List View. See Update the DM Agent Application or Identify Device DM/PS Version for more details.
Before adding the devices, you might consider changing the default Display Name Format. The Display Name Format is the format used by newly added devices to display their Display Name.
The default Display Name Format is $[model]$($[ip]$), and when new devices are added to CloudStream DM, the devices' Display Name will be their Model Name (IP Address).
