Flexible Administrator Role
The Flexible Administrator role (FAR) provides a security role with Custom Privileges for the MFPs. This role is used to limit machine privileges in cases where you want to:
-
Limit a user group to update firmware only or to change email settings, protocols, or firmware
-
Avoid using one of the four shared Admin accounts on the MFP
FAR authenticates with accounts from OIDC or LDAP, and there is no limit on the number of accounts assigned this role because it is based on group membership.
A user with both general 'user' and Flexible Admin privileges can login to the MFP as a general user, but can switch to a Custom Privilege role to access and configure pre-determined device functions.
Prerequisites
-
The DM Agent must be installed on the target models. Refer to Add Devices to CloudStream DM. Prior to installation, refer to Flexible Admin Role - Supported Models to confirm the support list.
-
Directory service accounts must be configured to connect to CloudStream. Refer to OpenID Connect Authentication Profile or LDAP Authentication Profile.
-
A dedicated group for the Flexible Admin Role must be created within your directory service. This group will be used by the CloudStream Embedded App to authenticate user permissions.
Flexible Admin Role Configuration Procedure
To configure the Flexible Admin role, you must complete the following steps in the order shown below.


1. Install the Firmware
Support for the Flexible Admin Role requires specific firmware. You can install the firmware package using the Cloudstream DM portal OR via WIM.
 Before proceeding, refer to Flexible Admin Role - Supported Models and confirm the models that support this firmware.
Refer to Firmware Template to add the package to a template, and then Create a Configuration Task and Run a Configuration Task to apply this firmware template to the target devices.
The firmware is available from your regional Ricoh Support site (listed below). On the download page, select the target device, and then look for the Firmware Update Tool.
-
RCA: https://www.ricoh.ca/en-CA/support-and-download
-
RUS: https://www.ricoh-usa.com/en/support-and-download
-
RE : https://www.ricoh-europe.com/support/drivers-and-downloads/
-
RA: https://www.ricoh-ap.com/downloads
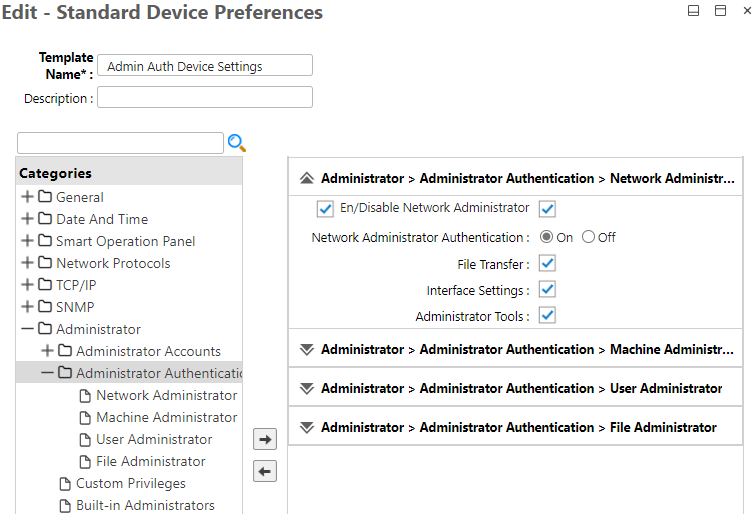
2. Set the Administrator Authentication on the Devices
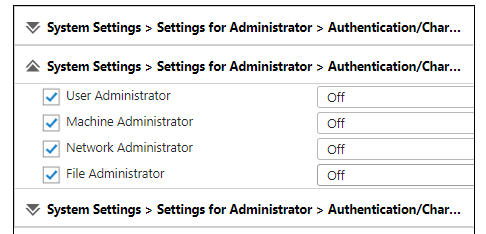
You must create a Standard Device Preferences (SDP) template that enables all Administrator Authentication preferences on the target device(s), including network, machine, user, and file administrator settings. After creating the template, you can create and run a configuration task to update these preferences on the target device(s).
 You can also perform this procedure in WIM. These settings are located under Device Management ®Configuration ®Device Settings ® Administrator Authentication Management.
-
Login as administrator.
-
Go to the Device Configuration section.
-
Expand Device Configuration Template and click on Standard Device Preferences.
-
Create a blank template in Standard Device Preferences (SDP)
-
Expand the Administrator category and then click Administrator Authentication.
-
Click Add
 to move the following four subcategories to the right for editing:
- Network Administrator
- Machine Administrator
- User Administrator
- File Administrator
-
In all four subcategories, enable ALL options (as shown in the screen capture above).
Options unchecked in the subcategory are considered outside of the Administrator's control and can be controlled by the general user.
-
Save the template.
-
Create a Configuration Task and then Run a Configuration Task to apply this template to the target devices.
3. Enable Custom Privileges
You can now enable the Flexible Admin role on each MFP via a Standard Device Preferences (SDP) template.
For the following device models, Custom Privileges are enabled by default. If configuring FAR on these models, skip this step and proceed to 4. Enable External Administrators : IM C2010/C2510/C3010/C3510/C4510/C4510A/C5510/C5510A/C6010.
Follow these instructions to create the template:
-
Go to the Device Configuration section.
-
Expand Device Configuration Template and click on Standard Device Preferences.
-
Click +Add and choose the option to Create Blank Template.
-
Expand the Administrator category and then click Custom Privileges.
-
Click Add
to move the setting to the right-hand pane and adjust the preference. -
Click the [Custom Privileges] checkbox and ensure the [Enable] option is filled.

-
Save the template.
-
Create a Configuration Task and then Run a Configuration Task to apply this template to the target devices.
4. Enable External Administrators
To use the Flexible Admin role on the device, you must enable the External Administrator setting via an Extended Device Preferences template.
You can also perform this procedure in WIM. These settings are located under Device Management ®Configuration ®Device Settings ® Program/Change Administrator.
-
Login as an administrator.
-
Go to the Device Configuration section.
-
Expand Device Configuration Template and click on Extended Device Preferences.
-
Click +Add and then choose the Option to Get Settings From Device.
-
Enter a unique name in the Resource File field. The settings extracted from the target device will be named after the resource name you enter here.
You will use this Resource File within the 5. Configure Templates and Groups step below. -
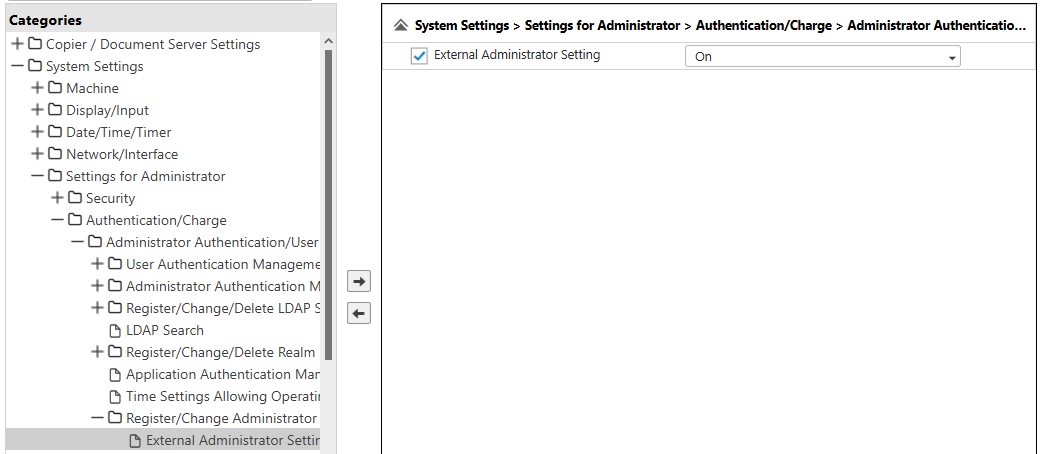
Expand System Settings ® Settings for Administrator ®Authentication/Change ®Administrator Authentication/User Authentication/App Auth ®Register/Change Administrator.
-
Click External Administrator Setting and then click Add
. -
Enable the checkbox for External Administrator Setting and select On from the list.
-
Save the template.
-
Follow the instructions in Create a Configuration Task and in Run a Configuration Task to apply the template you created above to target devices.
5. Configure Templates and Groups
This procedure allows you to create an Extended Device Preferences template that determines the device privileges that are associated with the specific FAR device group created within your OIDC or LDAP directory service.
You can also perform this procedure in WIM. These settings are located under Device Management ®Configuration ®Device Settings ® Program/Change Administrator ®Custom Privileges.
-
Go to the Device Configuration section.
-
Expand Device Configuration Template and click on Extended Device Preferences.
-
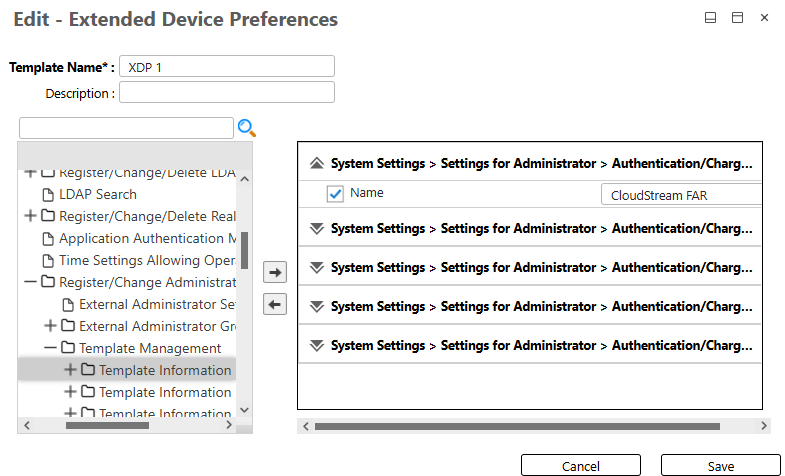
Click +Add and choose the Option to Create Blank Template and select the Resource file you created in 4. Enable External Administrators above.
To set the Templates:
Complete the following instructions for each individual template that you want to create. You can create up to 20 individual templates if necessary.
-
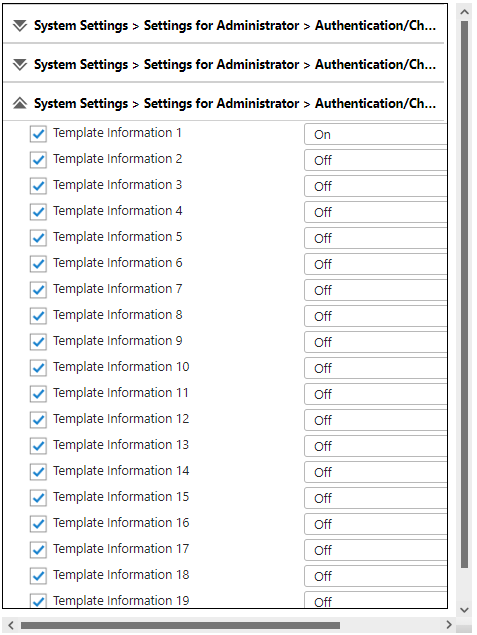
Expand System Settings ® Settings for Administrator ®Authentication/Change ®Administrator Authentication/User Authentication/App Auth ®Register/Change Administrator ®Template Management ®Template Information 1.
-
Click Template 1 Information, and then click Add
. 
-
Enter a name for the Template.
-
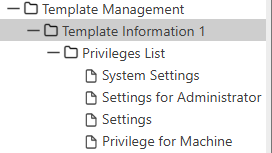
Modify the privileges in the following subsections of the Privileges List. When an option is set to ON, users of this template are able to access these privileges:
-
System Settings
-
Settings for Administrator
-
Settings
-
Privilege for Machine
-
To set the Groups:
Complete the following instructions for each individual group that you want to create. You can create up to 10 individual groups if necessary.
-
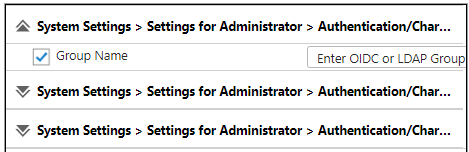
Expand System Settings®Settings for Administrator®Authentication/Change®Administrator Authentication/User Authentication/App Auth®Register/Change Administrator®External Administrator Group Management.
-
Click Group 1, and then click Add
. -
Enter a group name where the name matches the directory service name:
-
For OIDC, input the Object ID of the group.
-
For LDAP, input the LDAP group name.
-
-
Modify the privileges in the subsections of this group.
-
Standard Privileges: Set to OFF
-
Custom Privileges: Set to ON, and then select the template that you want this group to use. All other templates must be OFF. When the option is set to ON, users of this template are able to access all privileges within the template.
-
-
Save the template.
-
Follow the instructions in Create a Configuration Task and in Run a Configuration Task to apply the template you created above to target devices.
6. Test the Setup
To test the FAR access on an MFP, login to the device using a PIN, Card or username/password.
-
After a successful login, tap the Home button.
-
Tap the Menu icon located on the bottom right of the screen.
-
Select Administrator Mode.
-
If FAR configuration on this device was successful, you will see a screen that asks if you want to switch to the custom-privileges administrator mode.
-
Tap OK to proceed.
-
If the group you are assigned to is associated with a template where you can access all privileges, then you can edit all the settings when in Admin mode. If your group is assigned to a template with limited access, then a subset of settings are enabled when in Admin Mode.
7. Disable the Built-in Admin Access
This step is optional and allows you to disable the four shared built-in Admin access accounts to the MFPs for additional security. If you do not disable this account, the four shared Admin accounts can still be used to login and access the device functions.
Before you disable the [Built-in Administrators] ensure that CloudStream can connect to the OIDC or LDAP service to allow device administrator access. You can temporarily re-enable the [Built-in Administrators] option and push the updated template to a device if you need immediate device admin access. Optionally, you can enable the Built-in Supervisor if you decide to disable the Built-in Administrator. This will allow you log into the machine as a supervisor and re-enable the Built-in Administrator, if necessary. You can also re-enable the accounts by pushing an updated template to a device.
-
Go to the Device Configuration section.
-
Expand Device Configuration Template and click on Standard Device Preferences.
-
Click +Add and choose the Option to Create Blank Template.
-
Expand the Administrator category and then click Custom Privileges.
-
Click Add
to move the setting to the right-hand pane and adjust the preference. -
Click the Custom Privileges checkbox and ensure the Enable option is filled.
-
Expand the Administratorcategory and then click Built-in Administrators.
-
Click Add
to move the setting to the right-hand pane and edit the preference. -
Click the Built-in Administrators checkbox and then click Disable.
-
Click the Built-in Supervisors checkbox and then click Enable. This account will be useful if you need to login and re-enable the Built-in Adminstrator.
-
Save the template.
-
Follow the instructions in Create a Configuration Task and in Run a Configuration Task to apply the template you created above to target devices.