Create a Configuration Task
There are two to three steps to create the configuration task:
| Order | Instructions |
|---|---|

|
Enter the name and select a task type. The task's name and the Task Type will determine the course of action when the task is executed. |

|
(Optional) Select a template. If the task type is "Check Template" or "Apply Template," a configuration template is required. |

|
Add target devices or groups. Add the target device and the target groups. Users can select both devices and groups. |
-
Login as an administrator.
-
Go to Device Configuration, then click Configuration Task.
-
In the Configuration Task screen, click [Add].
-
Enter the name of the configuration task. The task name must not be a duplicate of an existing configuration task.
-
(Optional) Enter the description of the task.
-
Select a Task Type.
Select one of the three Task Types depending on how you want to run your configuration task.
Task Type
Description
Check
A “Check” task type will compare items in the configuration template to items from the target devices against which the template is executed. An activity log entry is recorded for the target devices to list the checked items and whether they match.
Apply
An “Apply” task type will compare items in the configuration template to items from the target devices against which the template is executed. The settings will then be applied to the devices. An activity log entry is recorded for the target devices to list the checked items and if they are a match or a change was applied.
Devices may reboot one or more times depending on the setting items.
Reboot
When selected, the target devices will restart.
- Click [Save]. This will create the configuration template and display it on the list. You must save the template first before you can select the target templates and devices.
- If the selected Task Type is "Reboot device", please go to step #13 to add the target devices.
- If the selected Task Type is "Check Template" or "Apply Template", open the Template node.
-
Click [Select Target Template]. A sample image is displayed below:
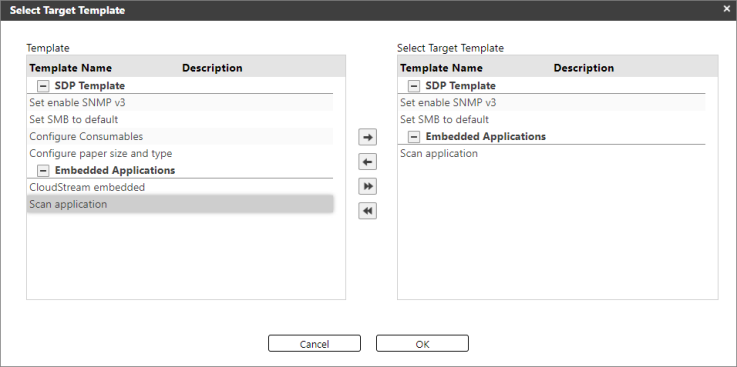
A "Select Target Template" pop-up dialog will display. On the left-hand side, the Templates pane lists all the available configuration templates. Select one or more templates, then click the right arrow button
 to add the template to the Target Templates pane.
  Please note that only the templates listed in the Target Templates pane will be added to the configuration task.
 Please note the following important information:
-
Please select one firmware template per configuration task. If you want to use another template, please create another configuration task with a different firmware template and run them one at a time.
-
When you run a configuration task that updates the firmware but get a "Partial Failure" result in the Activity logs, one possible cause is that the firmware applied is incompatible with the target device. Please check the compatibility of the firmware with the device.
-
Please select one embedded template per configuration task. If you want to use another template, please create another configuration task with a different embedded template and run them one at a time.
-
If you selected more than one embedded or firmware template, only the last template selected is applied.
Button
Function
Adds the selected template(s) to the Target Templates pane.

Removes the selected template from the Target Templates pane.

Adds all templates from Available Templates to Target Templates pane.

Removes all templates from Target Templates.
OK
Closes the "Select Target Template" dialog, and the templates listed in the Target Templates pane are then displayed in a list with their template name and description.
When clicked an error message will display if the Target Templates pane is empty.
Cancel
Cancels the selection of the templates.
-
- Click [Save]. You must save the templates selected before going to the next step.
- Open Target Devices/Groups.
- Add devices or groups.
To do so, you can use the two buttons below to populate the target devices and groups list.
Button
Function
Add Target Group
Clicking this button will display the "Target Groups" dialog.
The dialog contains the Available Groups pane and the Target Groups pane.
The list of Available Groups is based on the Device List groups configuration, whose defaults are Host Name, IP Address, and Models group. Customized groups are also displayed and can be selected as a target group.
Like the Template step, move the device groups from Available Groups to the Target Groups pane by clicking the
button. If you want to select all devices, you can check the All Devices box. Checking this box will add all the devices and or groups to the target devices/groups.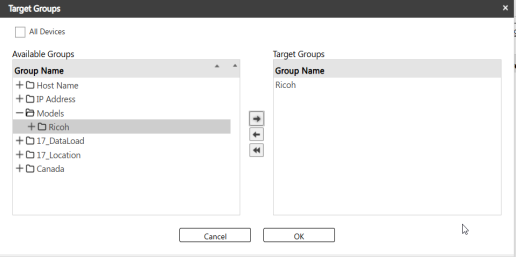
Add Target Device
Clicking this button will display the "Select Target Devices" pop-up dialog.
The dialog contains the Available Devices pane and the Target Devices pane.
Like the Template step, use the
button to move devices from Available Devices to the Target Devices pane.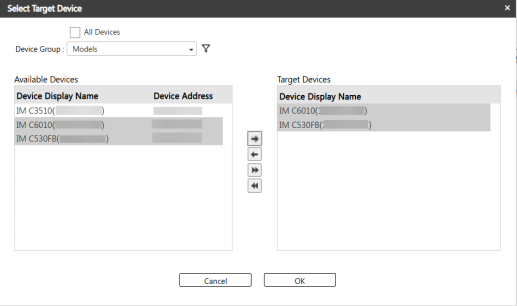
Filter Devices
For easier selection, use the filter to search for the devices you want to add to the Target Devices pane.
Select a device group.
Click the
 icon and enter the display name or the device's IP address into its corresponding column.
 Click the bottom
 icon, or just press enter from your keyboard.
Devices that match the search will be displayed in the Available Devices pane. Select the device from the list.
Click
button.
You can also perform filtering from the Available Devices pane.
If you want to select all devices, you can check the All Devices box. Checking this box will add all the devices and or groups to the target devices/groups. - Click [OK] to add the devices/groups to the list.
You may use the following buttons to remove devices or groups from the list.
|
Button |
Function |
|---|---|
|
Delete |
Removes the selected device or group from the list grid. You can also remove devices if you open the "Select Target Devices" dialog and remove the devices from the Target Devices pane. You can do the same in groups too. |
|
Delete All |
Removes all the devices and groups. |