Register an OIDC User
Register your OpenID Connect (OIDC) account with RICOH CloudStream Device Management (DM) so you can use your account to login to CloudStream-enabled Ricoh MFPs, where you can release print jobs securely and perform secure scanning.
To register an OIDC account, follow the steps below.
-
Open a browser and go to the CloudStream DM user registration page.
The user registration page has the same domain as the CloudStream DM portal.
If you have the portal's URL, copy the domain and append /registration.html at the end.
Typically, the URL will look like this: https://CompanyName.region.cloudstream.ricoh.com/registration.html
Contact your administrator if you still need the URL.
-
In the login screen, click [Login to OIDC].
-
Click the dropdown menu and select the OIDC provider where you would like to be authenticated.
-
Click [Login].
-
You will be redirected to the OIDC external provider for authentication. Please login to authenticate.
If the authentication fails, please contact your IT administrator or the external authentication provider for support.
If you are using Entra ID as your authentication provider and you encounter a redirect URI problem, refer to OpenID Connect Authentication Profile for information to setup the correct URI.
-
You will return to the User Registration page and will see a success message saying:
At the same time, the One-Time Password (OTP) is generated and sent to your email.
 No OTP will be generated if the registration fails.
 -
After you register your OIDC account with CloudStream DM, login to the MFP using your OIDC account.
-
Go to a Ricoh device with RICOH CloudStream Print&Scan embedded installed.
A device with Print&Scan embedded will display a screen similar to the image below.
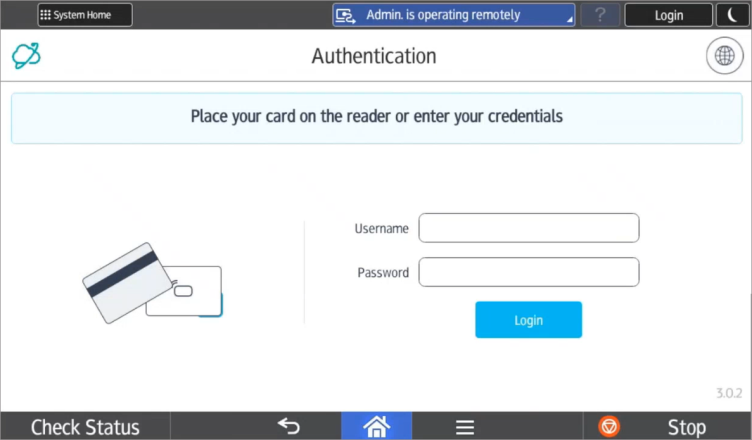
 The display in the login screen depends on how the embedded client is configured. To allow OIDC login, the embedded client must have Username + Password Login or card login as the login type.
-
Enter your OIDC username, including the domain name. For example, myaccount@oidcdomain.com
-
Enter the OTP sent your email and then click the [Login] button.
-
A successful login will display the RICOH CloudStream Print&Scan My quick actions screen.
Register your access cards so you can login by tapping your card to the MFP's card reader.
Alternatively, the CloudStream DM administrator can generate a user PIN that you can use to login to the MFP. Note that the card login or the PIN login must be enabled in the embedded client configuration.