Configure User PIN
 Only admins assigned the User Admin role can make changes to PIN Settings; otherwise, an "Access Denied" message appears when trying to save User PIN Settings. Refer to
Administrator Accounts for details.
Only admins assigned the User Admin role can make changes to PIN Settings; otherwise, an "Access Denied" message appears when trying to save User PIN Settings. Refer to
Administrator Accounts for details.
The User PIN Settings configure how the PINs are generated and set up the email options. Access this feature in User Management, then click Settings.
The following are important notes you need to know before you set the User PIN Settings.
-
If the 'Enable User PIN' is unchecked, users cannot login to the MFP using a PIN.
-
If users were already registered before the User PIN setting is enabled, a PIN is automatically generated for each user.
-
Similarly, for new users, a PIN is automatically assigned to them.
-
It is recommended that you enable the Email Options so the system will email the users their assigned PIN.
-
If you decide to disable the User PIN Settings after PINs are assigned to users, the [Change User PIN] button in User Properties will be disabled. However, their PIN is still saved in the system, so when you enable the User PIN Settings again, existing users can still use their old PIN.
Enable the PIN and configure the required settings.
-
Login as an administrator with User Admin privileges.
-
Go to User Management section.
-
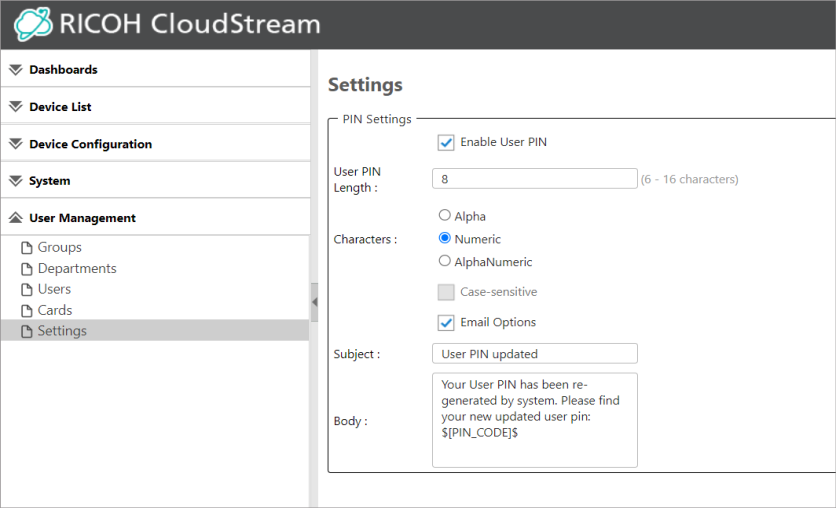
Click Settings. You will see a similar screen below.
-
Check Enable User PIN. Enabling this item will also enable the required fields under it.
-
Specify the User PIN length. This is a required field. Please input a number between 6 to 16 inclusive.
-
Select the type of characters generated for the PIN.
-
Alpha - Only alphabet characters are generated.
-
Numeric - Only numeric characters are generated.
-
Alphanumeric - Both alphabet and numbers comprise the generated PIN.
-
-
(Optional) Check if you want to allow the PIN to be Case-sensitive.
If checked, the user PIN is sensitive to capitalization of letters. Users must input the PIN with the same capitalization. This option is only available if the chosen pattern is alpha or alphanumeric.
-
(Optional) Check Email Options. The Subject and Body fields will be required when this option is checked.
Enabling the email option will send the generated PIN to the user's email address. If this option is not enabled, please copy the generated PIN and share it with the user.
Email Server Setting must be configured for this option to work. Please see Email Server Settings for configuration instructions. -
(Required when Email Option is enabled) Enter email subject.
When Email Options is enabled, the Subject is populated with the following text:
-
(Required when Email Option is enabled) Enter the Body of the email.
When Email Options is enabled, the Body is populated with the following text:
The email body must contain the user PIN variable: $[PIN_CODE]$. If not, the user PIN will be appended at the end of the body. -
Click [Save].
If the Email Option is enabled and you decide to disable it, the value in the Subject and Body will be removed. If you enable the Email Option again, the Subject and Body will be populated with their default values.
To change a specific user PIN , go to the User Properties and click the [Change User PIN] button. For more details, refer to Edit User Properties.