Email Server Settings
Email messaging is a requirement before creating alert policies and other features that send email messages.
You can also set the License Expiry Notification to notify the specified email addresses days before the licenses expire and help you procure an extension license before the expiration date. Refer to License Expiry Notification.
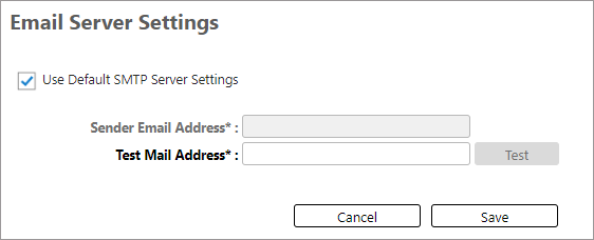
The RICOH CloudStream Device Management (DM) has a built-in Email Server system that you can use. Check the "Use Default SMTP Server Settings" and try sending a test email by adding your email address in the Test Mail Address field and clicking [Test]. By testing the default SMTP server, you will receive an email sent from CloudStream DM that ends with "cloudstream.ricoh.com".
 To use the system email server, you must check Use Default SMTP Server Settings.
If you would like to use your own Email Server, you can do so by following the instructions below.
-
Login as an administrator.
-
Go to the System section.
-
Expand Server Settings and click on Email Server Settings.
-
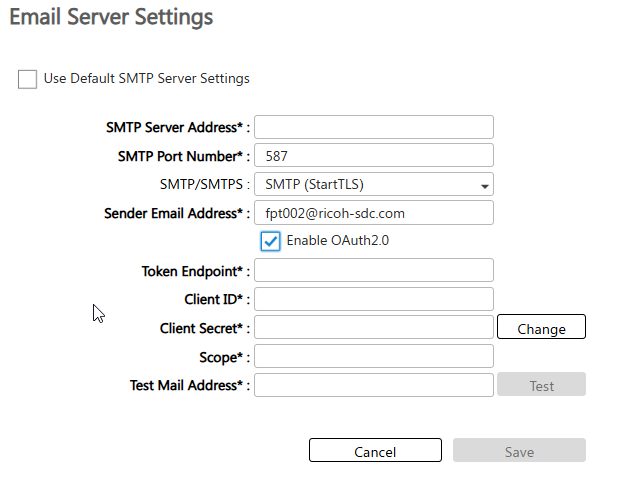
Uncheck "Use Default SMTP Server Settings" to use your own SMTP server. After you disable the checkbox, additional settings appear.
-
Provide values to the required settings in the table below. If enabling OAuth2, proceed to step 6 instead.
Settings
Description
SMTP Server Address
Enter the address of the SMTP server. Default value is "smtp". This is a required field. SMTP Port Number
Enter the port number of the SMTP server.
The default is 587. This is a required field.
SMTP/SMTPS
Specify whether or not to use a secure connection. This is a required field.
-
No Security - The connection is not encrypted.
-
SMTPS (SMTP over SSL) - The connection is encrypted. This is the default selection.
-
SMTPS (StartTLS) - The connection is initially created over plain text. If the server supports the StartTLS command, the connection is updated to an encrypted channel.
Sender Email Address
Enter the sender's email address. This is a required field.
This is the email address shown in the emails "From" field.
Account Name
Enter the account name you want to use for authentication. Default value is 'smtpuser". This is a required field.
Password
Enter the password to use for authentication. This is a required field.
Test Mail Address
Enter the email address to send a test email. This field is required when you click the [Test] button.
Use the [Test] button to check the connection to the email server.
-
-
Enable the OAuth2 checkbox if enabling SMTP with OAuth 2.0 authentication.
OAuth2 Settings
Description
Token Endpoint Enter the URL of the token endpoint that is used to contact the provider to obtain an access token.
Client ID Enter the Client ID of the application registration for which the mailbox is configured and used to send email over SMTP.
Client Secret Enter the Client Secret of the application registration for which the mailbox is configured and used to send email over SMTP. The password is filed and encrypted before it is saved.
Scope Enter or more scopes that Cloudstream will use to place a request to the provider.
For Microsoft Exchange, the default scopes would be "https://outlook.office365.com/.default", "offline_access"
If entering more than one scope, ensure you leave a space between each scope.
Test Mail Address
Enter the email address to send a test email. This field is required when you click the [Test] button.
Use the [Test] button to check the connection to the email server.
-
Complete the information required on this page and click [Save].
Check the test email account you entered to ensure the connection to the email server is successful.
The License Expiry Notification allows you to specify the number of days a notification is sent before the license expires.

There are three settings you must configure.
|
Settings |
Description |
|---|---|
|
Days |
Select from 1 to 90 days. Select the number of days the notification is sent before the license expiration date. For example, if the number of days selected is 20 and the license expiration date is January 31, the email recipients will receive a notification email on January 12 (20 days before expiration) and another notification on January 31 (the expiration date). |
|
Language |
Select the language to be used. The content of the email notification is translated to the chosen language. |
|
Email Address |
Specify the recipients email addresses separated by a comma. |
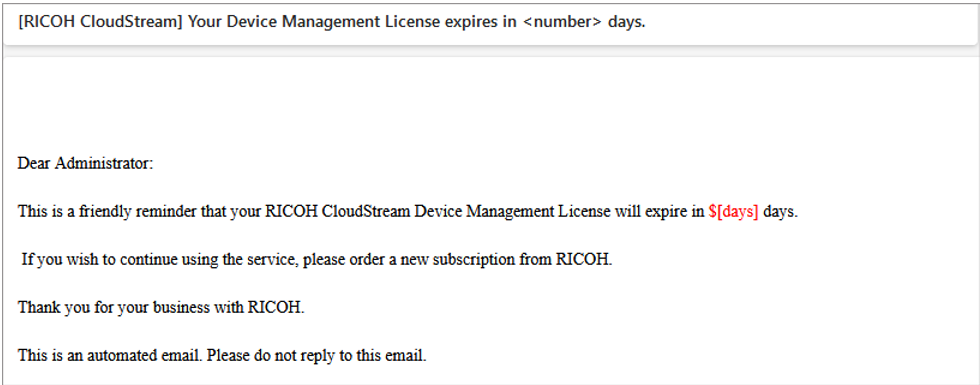
The recipients will receive an email notification similar to the image below. Note that <number> and $[days] is the number of days you set in the License Expiry Notification.
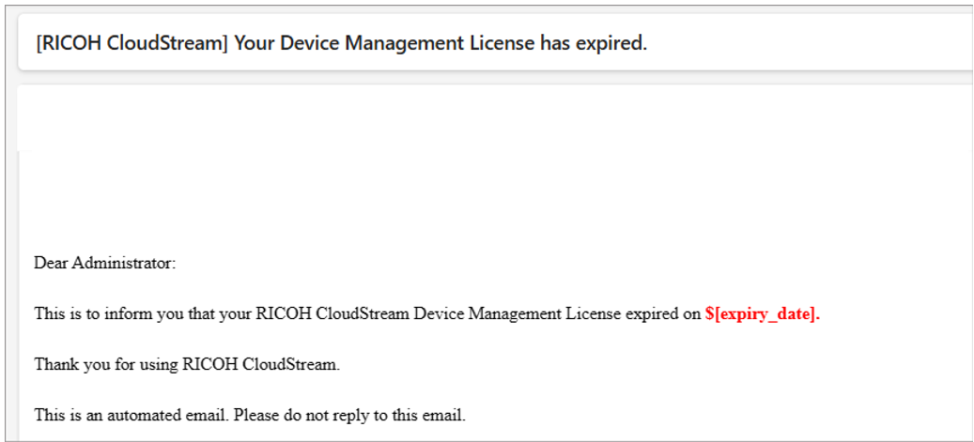
On the day of the expiration date, you will receive an email notification similar to the image below. Note that the $[expiry_date] is the license expiration date.
If you receive the above emails, please go to [System], expand [Security Settings], and click License Management to see the licenses about to expire. For details go to License Management.
It is recommended that you purchase an extension license so the system will automatically renew your licenses without interruption. Please contact Ricoh Sales in your region to place the order.