Install Print&Scan PC Client
| Prerequisites |
|---|
|
RICOH CloudStream Print&Scan tenant's domain name. |
|
Your OIDC account is registered to the CloudStream DM. To register a user, refer to Register Users. |
 You can find detailed Print&Scan PC Client documentation
-
Run the installer.
-
Read the License agreement and select agree to proceed.
-
Select 'Advanced installation' as the Installation Type.
If you choose 'Quick installation', the PC Client application will be installed but you have to edit the Account Domain Name and User Authentication in Service Configuration dialog after the installation. Refer to Modify PC Client Service Configuration for steps.
-
In the Server Parameters screen, enter the following:
-
Server host name: Enter the address or host name of the CloudStream server . For “Local" storage mode the address should be the account DNS of the CloudStream primary server.
-
Account domain name: Enter the domain name of the target account. It can be found in CloudStream Web UI on the Customer information tab.
-
User authentication: Select 'RICOH CloudStream OAuth2' as the User Authentication.
-
Storage mode: – Select where RICOH CloudStream Client stores the data: Cloud storage, Local storage, or Hybrid (direct print locally, secure print to cloud).
-
API key: – Enter the API key from the account settings. If omitted the default (restricted) API key will be used. Default API key will be removed in the future product versions.
-
Enable secure login for session authentication types: – Select this option to enable RICOH CloudStream Client registration as an endpoint which must be authorized by the administrator to use insecure login types (such as Session User or User Principal Name).
-
Enable offline installation: – Enable this option to install RICOH CloudStream Client without registering or checking server connectivity.
-
-
Select
-
Click [Next].
By clicking [Next], the PC Client will connect to the Print&Scan application.
If the connection fails, you can still continue to install the PC Client by checking the Enable offline installation box.
You can modify and test the connection again after installation. Refer to Modify PC Client Service Configuration for steps.
-
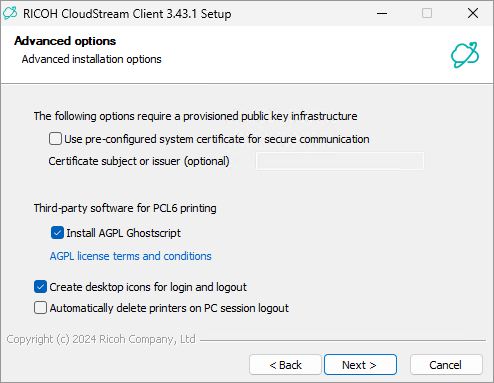
On the Advanced options, check Create desktop icons for login and logout.
This will create a shortcut in your desktop so you can click login and logout without going to the notification tray.
-
Click [Next], then click [Install].
Successful installation will display RICOH CloudStream Print&Scan PC Client in the Notification tray.
Modify PC Client Service Configuration
-
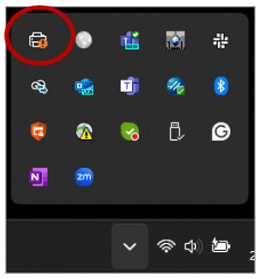
Open the PC Client configuration menu from the notification tray.
-
In the RICOH CloudStream client configuration screen, click [Service setup...].
-
Enter the domain name in both the Server host name and Account domain name field.
-
Select 'RICOH CloudStream OAuth2' as the Authentication Type.
-
Choose a storage mode. For more information about modes, refer to https://manual.na.ps.cloudstream.ricoh.com/docs/ricoh-cloudstream-client-overview.
-
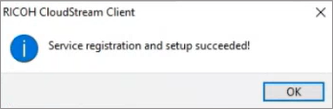
Click [Register service].
You should be able to register the service successfully and you will see the following message.