Set Custom Report Parameters
Setup the Parameters step. If you want to modify the General settings, go to Create Custom Report Template.
-
Clicking next will display the Parameters step. Configure the details and page settings of the report template. The items that appear and can be configured vary depending on the report template type.
-
Select value for Report Details.
-
Summary Only - displays the summary of the report only.
-
Details Only - only the details of the report are displayed.
-
Summary and details - both are displayed.
-
Select value for Sort Order.
Item Name
Function
Select the first condition for sorting. Be sure to configure the first condition before going to the next priority.
Select the second condition for sorting.
Select the third condition for sorting.
-
Select a value for Page Setup.
-
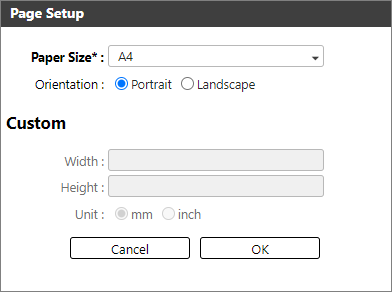
Click [Change ...] to display the Page Setup dialog box and select the paper size and orientation.
Item Name
Function
Paper Size
Select the paper size to be used to output the report. Available paper sizes:
-
A4
-
A3
-
B4
-
B5
-
Letter
-
Legal
-
11x17
-
Custom
Orientation
Select the paper orientation. Available orientations:
-
Portrait
-
Landscape
Width
Specify the paper width when the paper size is set to [Custom]. Specify a value from 20 to 5,080 mm.
Height
Specify the paper height when the paper size is set to [Custom]. Specify a value from 20 to 5,080 mm.
Unit
Select the unit (mm, inch) to be used.
-
-
Select value for Report Target.
The Report Target settings will not be available for some templates. Some templates will also have different Report Targets based on their purpose.

If the template supports the items listed here, you can configure the items with the information below.
Item Name
Function
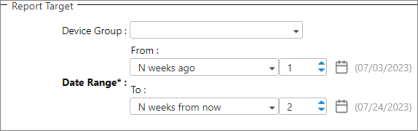
Device Group
Select the device group where the report details will be extracted from.
Lock this selection
If this item is checked, the Device Group item will not be editable when the report template is executed.
Date Range
Select the date range. Some examples are described in Examples of Reports Date Range.
Available options are:
-
Custom - A custom date range option will display. Please see the topic below.
-
Today - The current day.
-
Yesterday - The previous day.
-
Last Week - From Sunday to Saturday of the previous week.
-
Last Month - The previous month.
-
Last Quarter - The previous quarter. (January - March, April-June, July-September, October- December). If the current date is August 10, the date range will be from April to June.
-
Last Year - The date range will be from January to December of the previous year.
-
Week to Date - The date range will be from Sunday to the current day. If the current day is August 10, the date range will be from August 6 to August 10.
-
Month to Date - The date from the first day of the month to the current day.
-
Quarter to Date - The first date of the first quarter to the current day.
-
Year to Date - This is the default value. The date range will be from January 1 of the current year to the current day.
To set a custom date, select Custom as value then click on the date or the calendar displayed below it.
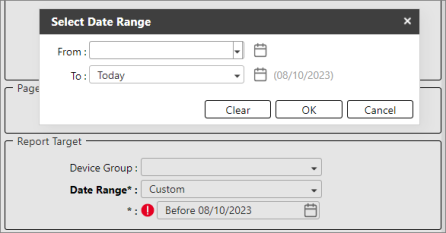
Custom Date Range options:
-
Today - The current day.
-
Yesterday - The previous day.
-
Current day of last week - The day of the previous week. If the current day is August 10, the current day of last week is August 3.
-
Current day of next week - The day of the next week. If the current day is August 10, the current day of the next week is August 17.
-
Current day of last month - The day of the previous month. If the current day is August 10, the current day of last month is July 10.
-
Current day of next month - The day of the next month. If the current day is August 10, the current day of next month is September 10.
- N days ago - N refers to a number. If the given number is 10, the date range will be 10 days ago to the current day.
- N days from now - N refers to a number. If the given number is 10, the date range will be 10 days from the current day.
- N weeks ago - N refers to a number. If the given number is 5, the date range will be 5 weeks ago to the current day.
- N weeks from now - N refers to a number. If the given number is 5, the date range will be 5 weeks from the current day.
- N months ago - N refers to a number. If the given number is 2, the date range will be 2 months ago to the current day.
- N months from now - N refers to a number. If the given number is 2, the date range will be 2 months from the current day.
 If you select the Lifetime Counters or Lifetime Counters by Group template, this field displays the "End Date" only. In this case, the report will retrieve counters from the database up until the selected End Date. If the parameter is not specified, it will select counters with the latest poll time.
 -
- (Optional) If the template has a Summarization part, then please select a value. The value selected will determine how the report data will be summarized.
Day - Summarize data by day. This is the default option.
Month - Summarize data by month.
Year - Summarize data by year.
- After all parameters are set, click [OK] to create the customized template.
|
Item Name |
Function |
|---|---|
|
|
Displays the report overview and/or details. Available options are:
|
|
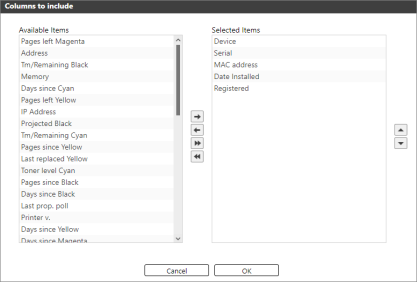
Columns to include |
Select the columns to be included in the report. Click [Change...] to display the dialog where you can set the columns that will be included when the report is generated. The example below shows the items available for selection to create a custom Device by Manufacturer report.
The left-hand side displays the Available Items, while the right-hand side is the Selected Item where the items are the columns that will be included in the report. To move the items to the other side, use the following buttons.
|
 This button will move the selected item to the right-hand side. The item will be added to the columns to include.
 This button will move the selected item to the left-hand side. The item will be removed from the columns to include.
 This button will add all items from Available items to Selected items.
 This button will remove all items from Selected items.
 This button will move the selected item upward. If you want to display the item as the first column in the report, move the selected item to the top.
 If you want to move the item to the farthest right column of the report, move the item down to the end of list. Make use of the up and down buttons to arrange your columns.