Parts of a Report Template
When you select a report template in the list, the report properties are displayed with two nodes: General information and Report Parameters.
General information
|
Item Name |
Function |
|---|---|
|
Template Name |
The name of the report template. Only the custom report template name can be edited; the standard report template name cannot be edited. |
|
Template Description |
The description of the template. |
|
Version |
The version number of the template. For a custom report template, it will inherit the version number of its base template. This item cannot be edited. |
|
Type |
The type can be custom or standard. |
|
User |
The user name of the admin who created the custom template. For standard templates, this field is empty. |
|
Base Template |
Displays the base template used to create the custom template. For standard templates, this field is empty. |
You cannot change the information in General node for Standard templates; however, custom template's name and description can be edited.
Report Parameters
The parameters have the following settings.
| Report Details. |
| Sort Order. |
| Page Setup. |
| Report Target. |
| Summarization . |

|
Item Name |
Function |
|---|---|
|
Report Contents |
Displays the report overview and/or details. Available options are:
|
|
Columns to include |
Select the item columns to be included in the report. Click the [Change...] button to display the dialog where you can set the columns to be included in the report. The dialog will display two list panes; the left-hand side displays the available items you can select, while the right-hand side is the columns that will be included in the report. To move the items to the other side, use the following buttons.
|
 The report summary is a short description summarizing the detailed information is shown at the beginning of the report, you can quickly grasp the overall trend.
 - This button will move the selected item to the right-hand side. The item will be added to the columns to include.
 - This button will move the selected item to the left-hand side. The item will be removed from the columns to include.
 - This button will add all items from Available items to Selected items.
 - This button will remove all items from Selected items.
 - This button will move the selected item upward. If you want to display the item as the first column in the report, move the selected item to the top.
 - If you want to move the item to the farthest right column of the report, move the item down at the end of list. Make use of the up and down buttons to arrange your columns.

Please select the column item you plan to sort, then select the sorting order.
|
Item Name |
Function |
|---|---|
|
|
The selected column and the type of sorting in 1st sort Priority will be implemented before other priorities. |
|
|
The column and sorting type will be implemented after the first priority. |
|
|
The column and sorting type will be implemented after the second priority. |

|
Item Name |
Function |
|---|---|
|
Page Setup |
Click [Change ...] to display the Page Setup dialog box and select the paper size and orientation. |
|
Paper Size |
Select the paper size used to output the report. Available paper sizes:
|
|
Orientation |
Select the paper orientation. Available orientations:
|
|
Width |
Specify the paper width when the paper size is set to "Custom". Specify a value from 20 to 5,080 mm. |
|
Height |
Specify the paper height when the paper size is set to "Custom". Specify a value from 20 to 5,080 mm. |
|
Unit |
Select the unit (mm, inch) to be used. |
The Report Target settings will not be available for some templates. Some templates will also have different Report Targets based on their purpose.

If the template supports the items listed here, you can configure the items with the information below.
|
Item Name |
Function |
|---|---|
|
Device Group |
Select the device group where the report details will be extracted from. |
|
Lock this selection |
If this item is checked, the Device Group item will not be editable when the report template is executed. |
|
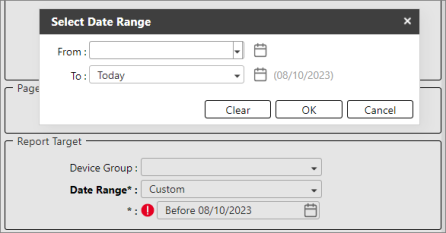
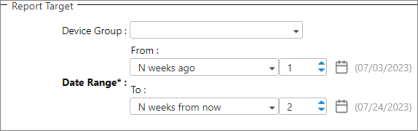
Date Range |
Select the date range. Some examples are described in Examples of Reports Date Range. Available options are:
To set a custom date, select Custom as value then click on the date or the calendar displayed below it.
Custom Date Range options:
|

If the report template has this section, please select how the data will be summarized.
|
Item Name |
Function |
|---|---|
|
Summarize By |
Select how the data will be summarized.
|